Installing Reactor under Portainer
Portainer is a docker environment and container management utility. Portainer can be used to install the docker image for Reactor, and create a running container from the image.
Installation of Portainer is beyond the scope of this manual; please use the installation instructions for your NAS' add-on component, or those on the Portainer web site, as appropriate.
These instructions were created using Portainer Business Edition version 2.16.2 and Community Edition version 2.16.2.
Creating the Reactor Container under Portainer
To install Reactor for the first time (i.e. create a new docker container running Reactor in Portainer):
-
Make a subdirectory tree to contain Reactor's data and configuration files. This can be anywhere on your NAS to which you have access, such as your user home directory. You can use other directories, even on other volumes, if you choose. If uncertain right now, just create a
reactorsubdirectory in your home directory, and then create two additional directories underneath that:datafor your configuration, rules and states; andreactor-extfor any extensions you need to install (now or future).Home Directory | +---- reactor/ | +---- data/ | +---- reactor-ext/ -
Log in to the Portainer UI on your system (e.g.
https://host_ip:9443/with whatever host name or IP you normally use).Hands Off!
Hands Off!
As you go through the steps below, unless you really know what you are doing, do not modify any field/setting that is not mentioned in these steps; just leave them at their default values.
-
Go to the Containers tab and click the Add Container button in the table header;
-
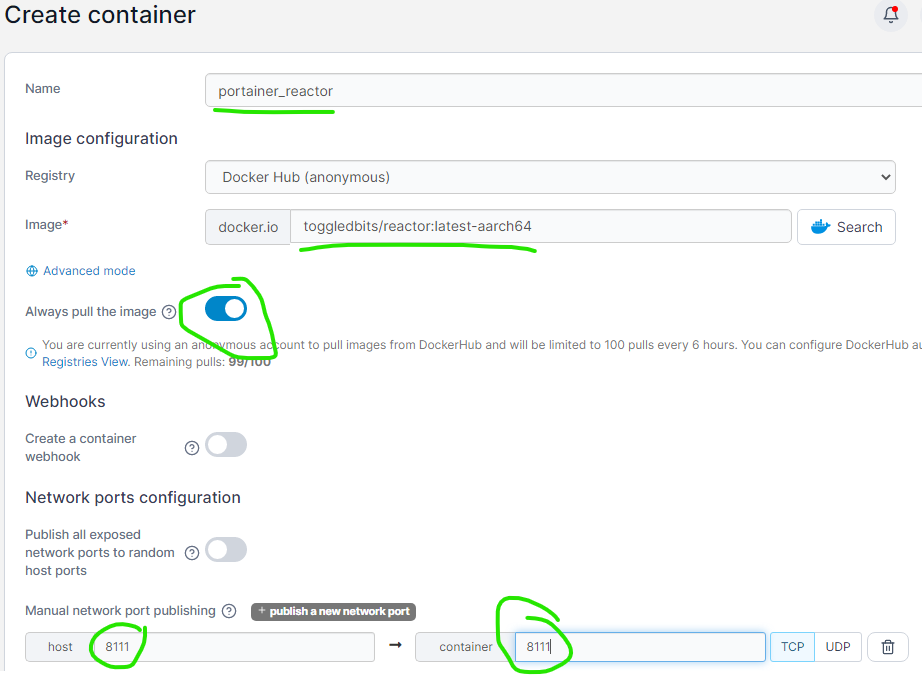
In the Name field, name the container (e.g.
reactor); -
In the Registry field under Image Information, choose
Docker Hub (anonymous); -
In the Image field, type
toggledbits/reactor... as soon as you start typing, Portainer should offer a list of possible images. Choose thelatestimage that matches the system architecture of your machine (e.g.amd64for Intel/AMD system,arm64for 64-bit ARM like RPI4/5, etc.); -
Set the Always Pull the Image switch as your sensibilities require: if you leave it turned on, the container will be updated to the latest build of Reactor every time it starts (note that restarting Reactor is not the same thing as restarting the container).
If you are using the
latestbranch builds, you'll always get the latest features and fixes, but this could also inject new bugs that impact your system operation unexpectedly (Murphy's Law says that will always happen at the worst time, like when you're on vacation). It's basically "auto-update", the usual consequences of which always apply to such a setting. If you want to completely control when Reactor is updated, turn this switch off. If you want a balance of the two, consider switching to thestablebranch builds (select thestableimage in the previous step) and leave this switch on. Thestablebranch builds are earlier builds chosen fromlatestthat were widely used with no significant issues reported. -
Under Network Ports Configuration, click the publish a new network port button and enter
8111in both the host and container port fields;At this point, your configuration should look something like this:
-
Scroll down to Advanced Container Settings and click the Volumes tab header, and click the map additional volume button. In the volume options, first click the Bind button. Then, in the container field, enter (exactly as shown here)
/var/reactor. In the host field, enter the path to thedatasubdirectory you created in the first step of these instructions (that would be/home/username/reactor/dataif you followed the recommendation there, whereusernameis the name of the user into which you had logged in);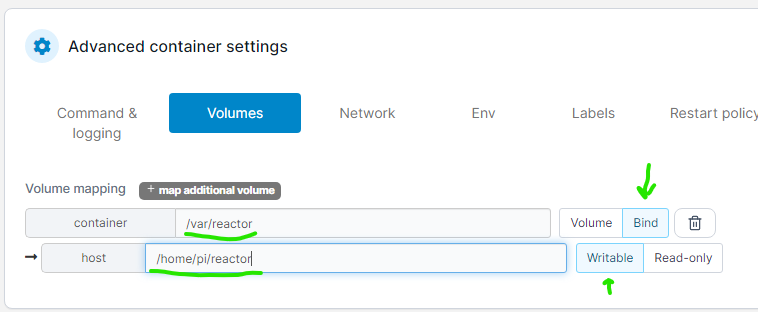
-
Map an additional volume, setting
/opt/reactor/extin the container field with yourreactor-extfull pathname in the host field. -
Then go to the Network tab. The
bridgenetwork is usually the default here and that's fine for most configurations; if it is anything other thanbridgeorhost, however, change it tobridge;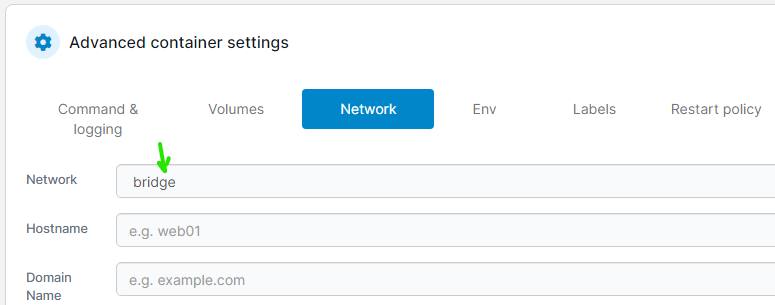
-
We will skip the remaining tabs for now, as these will be populated from the image when we first create the container. But, we will need to come back to this and make some edits after we create the container. To create the container, scroll back up and find the Deploy the container button and click it;
-
At this point, the Reactor container should be running — the URL for the Reactor UI will be
http://host_ip:8111/, wherehost_ipis the IP address (or hostname) of your host system (do not use the IP listed in the Containers list; that's an internal IP that won't be accessible anywhere but on the host system). You should see the Reactor UI and its About page.If Reactor doesn't start at this point (you can't get to the Reactor UI), see Troubleshooting below. Once you get it started, remember to come back here and finish the installation.
If/when you see the Reactor UI, continue...
-
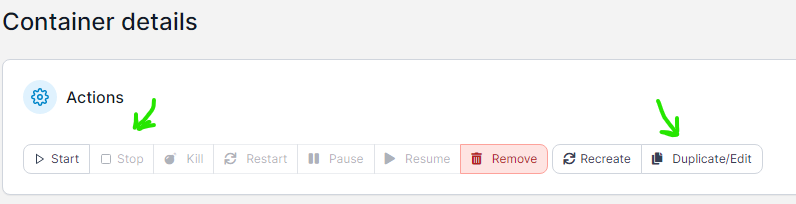
In the Portainer UI, go to Containers, click on the name of your Reactor container to open its detail page, and then click the Stop button to stop the running container. You will shortly get an alert announcing that the container has stopped.
-
Click the Duplicate/Edit button. This will allow you to edit the container settings. Now that some additional values have been loaded directly from the image on the first run, as mentioned above, we need to go back and provide just a little more info about your local system.
-
Scroll down to Advanced Container Settings and click the Env tab. You will see that the table has a number of environment variables defined. Look over the list. If there is a
TZenvironment variable and it contains the correct time zone, skip the next step. -
Click Add an Environment Variable and the UI will add a new row at the bottom. The name is (exactly as shown here)
TZand the value is a timezone name string. Find your string in this list and copy-paste it to the value field: https://grokipedia.com/page/List_of_tz_database_time_zones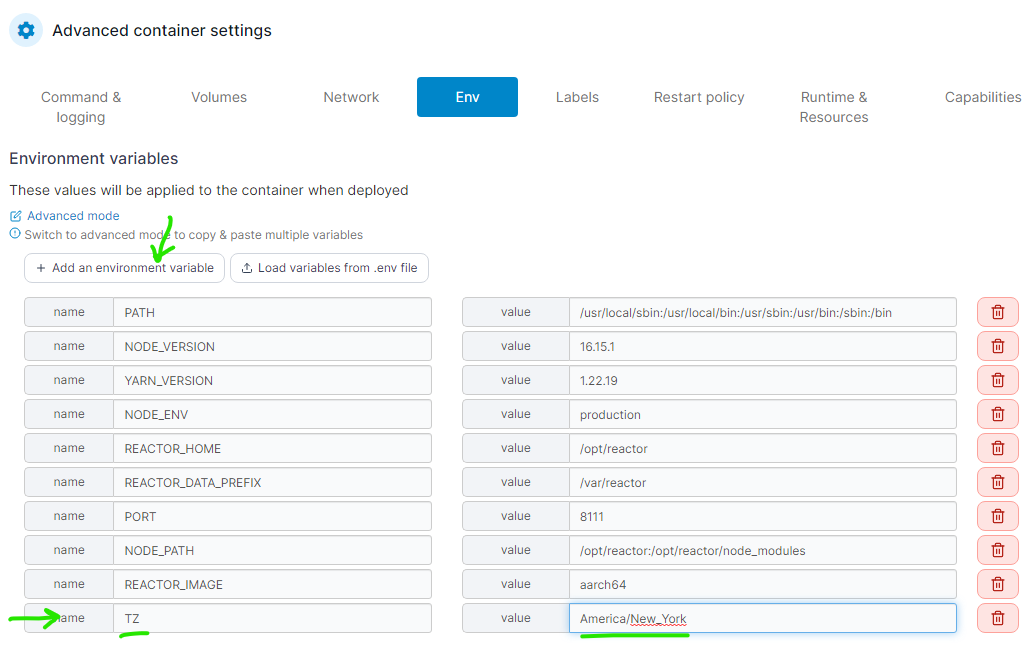
-
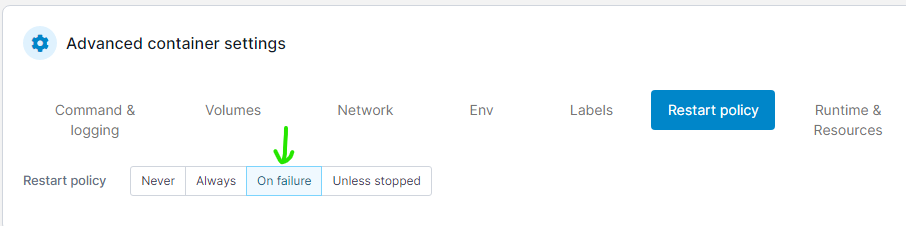
Click the Restart Policy tab header and choose On failure from the options. This will ensure that Reactor restarts if it crashes or you restart it from within the Reactor application itself. Otherwise, you will need to restart it manually;
-
Scroll back up and click the Deploy the Container button. You will be asked if you want to replace the container, and you should choose to replace it. The container will then be recreated with the modified settings and restarted.
-
Check that Reactor is running by going to the Reactor UI URL in a browser as you did above. At this point, if the UI is not accessible (Reactor isn't running), you've probably entered an invalid
TZvalue; go back and check it (see Troubleshooting Startup below).
Starting... Healthy
The Portainer containers list will report Reactor status as Starting for a minute or two after startup. It should then turn to Healthy. But it does take a bit, so be patient. If you can access the Reactor UI, it's up and running and the Portainer status will change eventually.
One more detail/check: notice the time fields in Reactor's UI header. The upper time is your browser's time, and the lower time is your host/container time. They should be within 5 seconds of each other if your browser and your host/container are in the same timezone. If they are not, you either set the TZ variable incorrectly, or the system time of either your browser or host is off. Most desktop systems automatically sync to network time, but if you are setting up a new host system, you may need to separately install and configure the tools for syncing to network time there (e.g. ntpd under Linux).
You may now proceed to Concepts & Terminology, where you'll learn some basics about Reactor's objects, and then start to configure your hubs/controllers and get access to their devices.
Troubleshooting Portainer Startup
If your Reactor container won't start or the Reactor UI is not accessible, here are some things you can check:
-
Go back and check the settings of your configuration. Small errors in any data you typed in can prevent startup. Make sure there are no extraneous spaces at the ends of strings like the timezone and volume names/paths, in particular.
-
Make sure the volume path you specified to bind to
/var/reactorexists (that is, if you followed the recommendations, the/home/username/reactordirectory should exist, and be owned, searchable and writable by the named user. -
If the bind directory exists, you may find a
reactor.logfile in thelogssubdirectory of that path. Reviewing its contents may point you to why Reactor isn't starting. -
If there is no
reactor.logfile, go to the Containers tab, click on the container name, and then under Container status you'll see a Logs link... click that and review the display.
The most common reasons for Reactor not starting/UI inaccessible on the initial start-up are:
-
Using the wrong IP address to access the Reactor UI. The IP address should be that of your host system, not the container's private IP shown in the container list.
-
Incorrect network mode; it usually should be either
bridgeorhost(unless you are an expert user and know docker networking and have custom configuration you chose to create). If one doesn't work, try the other. -
Failed to publish the Reactor port 8111. In the Containers list in Portainer, you should see 8111 listed in the Published Ports column of your Reactor container's row.
-
Incorrect bind mount parameters or misspelled/missing directory path; the
containerfield must read/var/reactorand thehostfield must contain a valid path to a writable directory. It must be aBindmapping, notVolume. -
Incorrect setting of the
TZenvironment variable in the second phase of installation. You can only set values from the list linked in the step above where settingTZis described.
If you still can't get Reactor started, post a request for help in the Reactor category at the SmartHome Community. Please read the posting guidelines before posting. Grab the container's Inspect output and post it with your request (formatted properly in a fenced code block per the method described in the posting guidelines). To get the Inspect output, click the Inspect icon for your container in the Containers table; then click the Text button in the upper-right corner; post the entire output; do not redact/edit). Remember: the effort you put in to your request will likely get a proportionate response. Low-effort posts like "I can't get Reactor to start" with no details are unlikely to get much, if any, attention.
Updating Reactor under Portainer
To update the Reactor image (and your container):
-
Log in your Portainer UI;
-
Go to the Containers tab (left navigation);
-
Click on the name of your Reactor container;
-
Click the Stop button to stop the running container;
Note: A shortcut for the above two steps is to click the checkbox to the left of your container's name and then click the Stop button in the table header.
-
Click on the Images tab (left navigation);
-
Find the image in the table that has the tag that matches your container's architecture (e.g.
toggledbits/reactor:latest-amd64). If the table is long, you can typereactorinto the search box to narrow it down;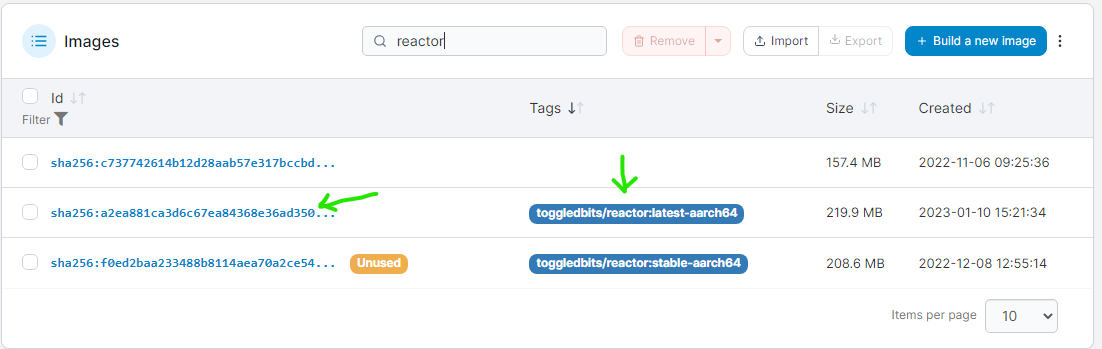
-
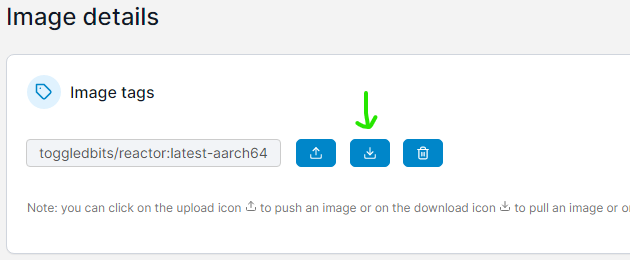
Click on its ID to bring up the Image Details page for the image;
-
Click on the download button under Image tags (the download button has an arrow pointing down; it may also display Pull from registry if you just hover the cursor over it);
-
Go back to the Containers tab (left nav) and (re-)start the Reactor container.
-
Go to your Reactor UI, hard-refresh your browser, and then confirm in the Reactor UI that the version/build number shown (upper-right corner) is that of the expected build.
Updated: 2026-Jun-22